Thursday, October 31, 2024

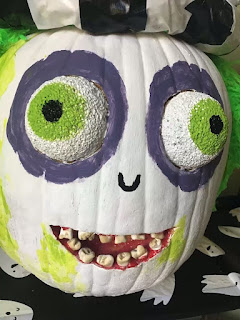
Beetlejuice pumpkin

 Happy Halloween 👻


I made Beetlejuice as a carved pumpkin for Halloween. He has a sandworm on top of his head.

I carved out his mouth and made some rotten teeth using air dry clay.

For his eyes, I used styrofoam balls that I cut in half and then painted. 

His hair is neon green yarn that I hot glued on to his head. I painted him white and sponged on some green paint for mold. 


For the sandworm, I used brown packing paper and wrapped that in duct tape for the black and white stripes. 


The head is cardboard and paper mache. His lips, eyes, teeth and tongue are made from air dry clay that I painted. 


Thanks for having a look. x

Tuesday, October 31, 2023

Gary the Snail Pumpkin

Happy Halloween 👻

Here is a pumpkin I made of Gary the snail from the cartoon Spongebob Squarepants. 


I made the base from cardboard and his body is a plastic bag stuffed w paper. I went on top of that with paper mache and hot glued around the edge for his slime.


His eye stalks are dowels that I hot glued to the base. 

His eyes are styrofoam balls that I painted yellow-green with black pupils. I hot glued them on top of the dowel stalks. I painted his body and stalks blue and the slime neon green.


The pumpkin is his shell which I painted pink with a red swirl and purple dots. I cut off the stem and turned the pumpkin upside down.


I painted a container green for his food bowl and wrote Gary on it with black paint.


Thank you for stopping by and having a look. 


Wednesday, October 31, 2018

Evil Witch Decorated Pumpkin

Happy Halloween,

Here is an evil witch I carved and decorated for 2018. Her chin, eyes, nose and teeth were all done separately and added on.


I carved out the mouth and left a bit to form her gums so I could stick her teeth in later on. I scooped out her eye sockets so her eyeballs would sit inside them. 

I formed her chin and nose using an aluminum foil form and paper mache. I used equal parts white glue and water along with cheap 1 ply napkins to give texture. 

I attached these with hot glue and toothpicks to give stability, then paper mached a couple layers over the entire pumpkin to blend them into the surface.

Overall, I did about 3 layers of paper mache.

I painted her with green acrylic paint all over. The eye sockets are black and the gums and mouth are red.

Next were her teeth. I made them out of pink polymer clay and baked them in the oven for about 5 mins. I painted them white then added a watered-down brown which I wiped off. I added hot glue and some thin wire onto the back so that I could stick them firmly into the gums.


I used bouncy balls cut in half for her eyes. I painted them white, then made a red iris and black pupil. I attached them using toothpicks and hot glue into the black sockets.

I made a couple warts out of air dry clay and attached them with hot glue to her nose and chin. 


 I added a black wig which I hot glued to the top of her head along with a witch hat.


Thanks for having a look.

Talk to ya soon. xx

Monday, August 27, 2018

Vera Lane Alice in Wonderland ATCoins

Hello,

Here are a couple artist trading coins I made for a swap in the Vera Lane Studio group on Facebook.

I used Dylusions paint and stencils for the backgrounds.

The digital stamps are called Alice and Rabbit I coloured them with Prismacolour markers and fussy cut them out. I added Glossy Accents to their eyes and red Stickles to the rabbit's heart.

I used Tim Holtz word stickers for the sentiments and edged around the entire circles in Black Soot Distress Ink.

Here's a closer look at them:


Thanks for having a look.

Talk to ya soon. xx

Sunday, August 19, 2018

Thankful for You ATC

Hello,

Here is an ATC I made for a swap in the Vera Lane Studio group on Facebook.

I used Distress Inks and stencils for the background. 

The digital stamps are called girl and cat with hats I coloured the cat with watercolour pencils and the girl with Prismacolour markers. I fussy cut them out.

I used Glossy Accents for the dots on her dress and Stickles for the pom pom on her hat.

I used Tim Holtz word stickers for the sentiment and added 2 heart stickers.

I edged around the entire ATC with Black Soot Distress Ink and added striped washi tape along the bottom.

Thanks for having a look.

Talk to ya soon. xx 
Saturday, July 21, 2018

Vera Lane Girls Artist Trading Coins

Hello,

Here are artist trading coins I made for a swap in the Vera Lane Studio group on Facebook.

I used paper scraps for the backgrounds and the images are digital stamps from Vera Lane Studio. 

I coloured the images with Prismacolour markers and fussy cut them out.

I added Glossy Accents to the pockets and dots.

I used Tim Holtz word stickers for the setntiments.

Thanks for having a look.

Talk to ya soon. xx

Sunday, July 8, 2018

Stampotique Mermaid ATC & Coin

Hello,

Here is a matching artist trading card and coin I made for a Stampotique swap on Facebook.

I used Distress Ink through a stencil for the backgrounds. 

I coloured the images using watercolor coloured pencils and fussy cut them out. 
I used Stickles in her hair and edged around both of them using Black Soot Distress Ink. 

I used Tim Holtz word stickers for the sentiments. 

Here is a close up look at them:


Thanks for having a look.

Talk to ya soon xx

Saturday, June 23, 2018

Vera Lane Studio Artist Trading Coins

Hello,

Here are my artist trading coins that I made for a Vera Lane Studio swap on Facebook.

I used scrapbook paper for the backgrounds. I used the digital stamps Unicorn and Pegasus and Vera's Zombies and fussy cut them out. 

I coloured the cat image with watercolour colored pencils and the unicorn image with Prismacolour markers. 
I added Stickles to the unicorn's mane and horn and Glossy Accents for their eyes. 
I used Tim Holtz stickers for the sentiments and edged them with Black Soot Distress Ink.

Here is a closer look at them:


Thanks for having a look. 

Talk to ya soon xx

Sunday, June 3, 2018

Stampotique Artist Trading Coins

Hello,

Here are my artist trading coins I made for a Stampotique swap on FB.

I used Dylusions paints in various colours for the backgrounds along with stencils and Distress Ink in Black Soot.

I coloured and fussy cut the images. I used Stickles on the wings and bow.

I added washi tape along the side and Tim Holtz word stickers for the sentiments.

Here's a closer look at each one:


Thanks for having a look.

Talk to ya soon xx